Pages

Monday, September 12, 2011

Senior Portraits

Vitaliy Krivoruk, Pine Tree Academy, Senior Class of 2011
This senior portrait prompted some questions about setting up lighting. Here is the following diagram and information.

Gear:
Canon 5D (yes, orginal)

Lens:
70-200 f/2.8L IS (yes, again original, not Mark II)

Settings:
White Balance: Sunlight
Focal Length: 105mm
ISO: 200
Aperture: f/11
Shutter Speed: 1/125 s

Transmitter: MiniTT1
Receiver/Trigger: FlexTT

Lighting:

Key Light(Flash 1): 580 EX II
Modifier: Photoflex Medium Softbox
Setting: Manual, 1/8 +0.3ev


Rim Light (Flash 2): 580 EX II
Modifier: bare on stand
Setting: Manual, 1/8


Post-processing

Camera Raw 6.4.1
Settings:
Temperature: 6400ยบ K
Tint: +4
Exposure: +1.85
Recovery: 0
Fill Light:0
Blacks: 0
Brightness: +50
Contrast: +25
Clarity: 0
Vibrance: +15

Photoshop CS5.5
Layer1: Curves, adjust black point to increase contrast, midtones to lighten
Blue Channel: increase warmth
Unsharpen Mask:
Amount: 150%
Radius: 0.2
Threshold 1


Any specific questions, drop me a message on Facebook, email me, or leave a comment.

Sunday, October 24, 2010

Application of Shooting in Manual

Meter off the sky, not the lighthouse.
So I am happy to review exposure whenever we get a chance.

Here is my thought process of shooting in Manual in order:

1) Before anything else, I knew we were outside, but I also knew that the light was starting to get darker because of sunset: ISO 800

2) I thought I'd be taking more portraits, so I wanted good bokeh (background blur): Aperture 4.0

3) As I walk around I see the light on the Lighthouse. I aim the camera at the sky, not the lighthouse, and then adjust the shutter speed (faster=higher number, less light) until my meter reading shows:
Negative 2/3rds of a complete stop.
4) Once the shutter speed has been set, I readjust the camera to obtain the framed shot above. At this point, I'm done choosing exposure so I know longer care that the camera is reading light off the lighthouse.

5) Squeeze the trigger.


Remember that as the light gets less, the shutter speed will actually drop, you have to keep changing the shutter speed to get the nice blue (-2/3 stop).


Remember, 1 full stop is the unit that we measure the light that is let into the camera by the lens. We are letting 2/3rds of a complete unit of light (2/3rds of 1 stop of light) into the sensor. We adjust this primarily by the shutter speed (since the aperture and the ISO were already chosen using other criteria).


Hope that helps!

Sunday, October 10, 2010

50mm Walk-A-Round

I took my own advice.

Greg Sprague was nice enough to take a group of us out in his boat around Harpswell.

Equipment:
One 50mm f1.4 lens
Zero flash
One photographer learning to see better.
 
No post-production (not even sharpening or curves or cropping), straight out of camera.
See the results HERE.

Give it a try, I bet you'll come out better because of it.

Hit the link for the first shot of the morning with the same lens.

Wednesday, October 6, 2010

REVIEW: Three Aspects of Exposure

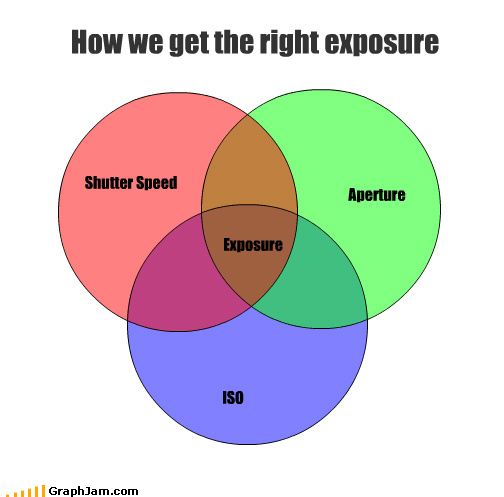
Venn Diagram for Exposure

There are only 3 things to adjust on a camera that help you get the right exposure. This is just a review of those because we're about to head into flash photography and we need to lay some foundation.

On all of your camera's (except Mr. Nikon Guy, Drew) you should be able to see the following, and I've labeled each so we can talk about them individually:
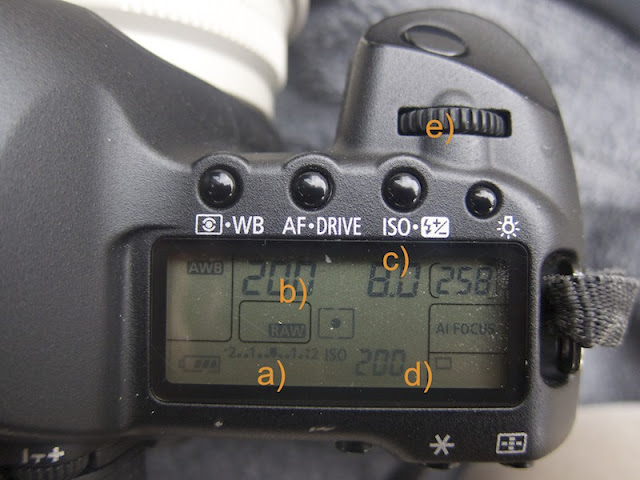
Top Display of the Canon EOS digital SLR.
If your camera is on, and you don't see this display, hit the shutter release button (SRB) just in front of label (e) on this photo. It will prompt this display and the MOST important thing you're looking for is the Exposure Meter, marked (a) on the display. If you look through the viewfinder and hit the SRB, there will be an amber color similar to this display. And also, on some newer camera, you can see it on the back display like this:
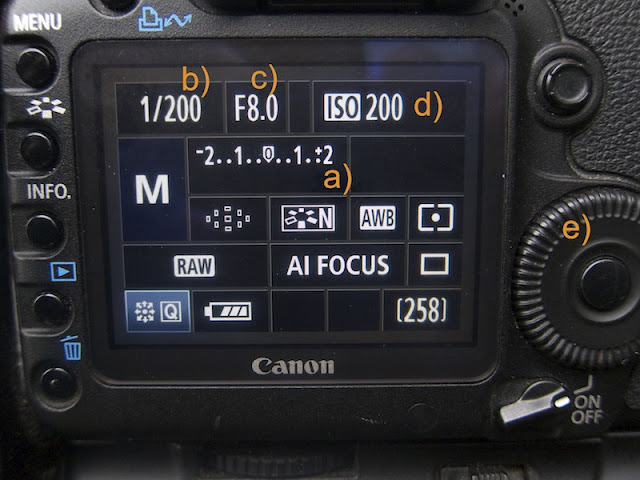
Back Display of a Canon EOS digital SLR

What this display tells us is how the camera is viewed the scene that it currently sees through the lens. If placed in Manual Mode, there will be an indicator that moves around from left to right on the this Meter. This meter tells us what the camera thinks about the lightness or darkness of the scene it is looking at. Essentially, if the indicator bar beneath this meter sits right in the middle (0 eV) it means that with the currently chosen Shutter Speed and Aperture and ISO, the camera is calculating the lightness of the scene as equivalent of 18% gray.

Now what does that look like? Here is a Photoshop rendition:

White, 18% Gray, Black
In other words, if you were to photograph the scene that the camera is looking it, it would have the lightness or darkness, or EXPOSURE, equivalent to the value of gray (18%) shown. In fact, there are professional cards that are used for checking this:


The photographer faces the camera towards this card, and adjusts their Shutter Speed, Aperture, ISO until the Exposure Meter shows the indicator right in the middle. Just to let you know about the other two (the white and black) on the Photoshop rendition, the black is about 2/3 stop darker, and the white is 1 + 2/3 stops lighter than the gray (according to the meter on my S90). This may be different when you purchase a calibrated card like the one shown above.

Now back to exposure. How do we choose each setting? Each facet has advantages and disadvantages for choosing the right speed, aperture, ISO. I placed a letter by where you will find the reading on your individual cameras (Stephanie, ask Daniel if you can't find it, your camera has the least of everyone on this list). Each setting is dealt with here in relation to what it does, and how it affects exposure, and why it would be chosen for adjustment.

b) SHUTTER SPEED - Time that the focal plane shutter in your DSLR stays open (in seconds)
     Slower Shutter Speed (<1/15 sec) - Lets more light in. Blurs motion. USED FOR: those cool City / Traffic pictures of the highways or streets where all the lights make a path of light. Or lightning shots.
     Faster Shutter Speeds (>1/60 sec) - Lets less light in. Freezes motion / makes picture more clear, even if your hand shakes. USED FOR: Sports, portraits, events like parties.

c) APERTURE -Opening of the iris inside the lens.
     Lower Aperture (f number, e.g. 2.8 or better) - more light let in, better bokeh, less of the picture in focus,     Usually PREFERRED for portraits.
     Higher Aperture (e.g. 16 or smaller) - less light let in, more of the picture in focus. Usually PREFERRED for landscape.

d) ISO - Sensor's sensitivity to light.
     Lower ISO, less sensitive, more clear. USED FOR: Fashion, Portraits, any photo that needs high clarity.
     Higher ISO, more grainy (not smooth picture), more sensitive to light, USED FOR: no flash photography, weddings, parties, edgy artsy treatment of the shot

So when you point your camera (without the lens cap on, I have to remind us because the meter will work with the lens cap on) to the picture you want to take, you have to adjust one or all three of those things.

PRACTICAL APPLICATION:
I choose those settings for the best quality of picture I can afford (for the light available). Here is an example:

Let's say we're going to be spending Sabbath afternoon shooting at Morse Mt. Before I pick up the camera, I know 2 things.

1) It's light outside on Sabbath afternoon. I'm choosing a lower ISO for clear shots of people. It's fall so I'll probably choose 200 (I don't want artsy photos with a lot of grain, and there'll be enough light)
2) There are people, so I'll probably want a low aperture (f4 sounds about right for single person shots, I want a good bokeh).

So now I set those two things on my camera. And then keep my finger on the shutter dial (e) and when I bring my camera to my eye, I hit the SRB half way to have the camera meter the shot, it shows me the Exposure reading. And I adjust my Shutter Speed so that my reading is what I want:
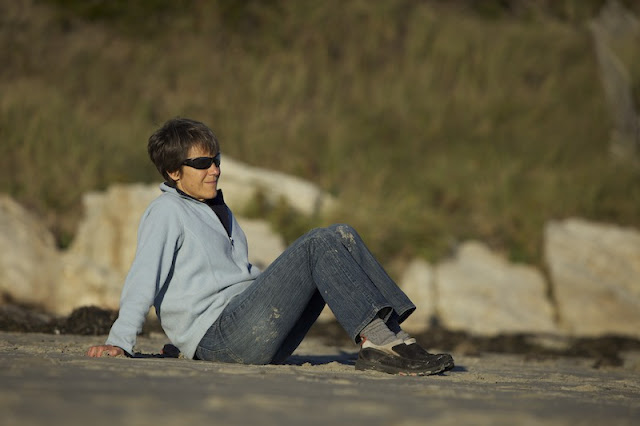
ISO 200    f4     1/4000 sec
All my shots for that day were ISO 200 at f4. I only adjusted my shutter speed. EVER. For the day. My shutter speed dial (e) is conveniently located right by the shutter release button (yours is too, Drew.) And that's the ONLY thing I'm thinking about now that I'm shooting. And composition. And beautiful it is in Maine, and how great the people are, and how I miss my friends when they're gone, and ...

Go through the thought process SLOW before each shot, and it will become more automatic. Remember: Slow is smooth, and smooth is fast.

You might be confused about the phrase 'when my exposure reading is what I want.' Most of the time, what I WANT is right in the middle of the meter (see the photo again). Next time we'll talk more about the exposure meter, when do you want it underexposed (stopped down) or overexposed (stopped up).

Any questions?

Friday, September 24, 2010

Colorspace

Canon 5D Mark II, 70-200mm f/2.8L IS @ 105mm, 1/200 sec., f/3.5, ISO 1600
I couldn't figure out how to photograph this iconic Maine Lighthouse. It's arguably the most photographed lighthouse in Maine, and I was running out of the time before they kicked me out of the park, and the sun was setting.

But we had talked about increasing contrast in the last post. What I'd like to have you do is look further on your image menu up on top of your image editor. 'Colors' for those of you using GIMP. Dan Margulis teaches something that I'm buying into more and more: Every photo has 10 channels. What!!

Usually we think of JPEGs as occupying only the RGB colorspace. In fact this colorspace is so common, that this is the only viable colorspace in GIMP. For a lot of work, this may be the only colorspace you'll need to adjust. You can increase contrast, and lighten a photograph's value, and color correct. But there is a richness that can be adjusted in the LAB (pronounced El-Ay-Bee) as well as the CMYK, with very useful Black (K) channel.

This isn't a tutorial in those, but I just wanted to pique your curiosity about colorspaces, and note up at the included photograph. I adjusted contrast in 6 of the 10 channels, with the most tweaking in the Lightness (L) channel in the LAB colorspace. Warmed the temperature (like you would with a warming filter, don't lie, you've all at least thought about doing it before!!) in the Blue channel of the RGB colorspace, and increased overall contrast of each hue in the A and B channels in LAB. Sharpened in the L channel to prevent noise production.

Worth the extra 30 seconds don't you think?

Welcome to the Digital Darkroom.

Wednesday, September 22, 2010

A Case for Photoshop

LEFT: Straight out of Camera, RIGHT: Minor curves adjustment in Photoshop, that's all!!
Back in film days, every good photographer learned how to use a dark room. Yes, everything out of the camera had to be just right, because you don't want to have to correct things in the dark room that could be taken cared of at the camera. Without knowledge of the darkroom, you might as well drop your film off at the local pharmacy with a 1-hour photo production service.

That said, Photoshop CS5 (Capture One, Lightroom, Aperture, etc., pick your poison) is the software that every digital photographer should know. We are not here to discuss the ethics of digital lipo-suction, or digital plastic surgery, but Photoshop use is the same as working the negative to its greatest potential. Without all the chemicals ... Photoshop is more environmentally friendly, and if you're conscientious of making what you have last longer, most every important thing that a digital photographer needs can be done all the way back to Photoshop 7. Yes, that's when Curves were introduced.

The above photograph depicts the reluctant subject shot straight out of camera (SOOC), and on the frame on the right, some minor digital negative adjustment in Photoshop. We are not removing any blemishes, though we know that it may be warranted considerably in this subject's particular case. WE MERELY ARE MAKING THE KIND OF ADJUSTMENTS THE HUMAN EYE MAKES WHEN VIEWING ANYTHING. That's all. The human eye, despite evolutionist's claim, is one of the most complex organs in the most complex organism created by God. It's photosensor behind the eyeball works in such a way, that it adjusts for light availability WITHIN each frame, not between frames, like you would on your camera, when you adjust your ISO setting.

What we did in this photograph is keep the picture in the RGB colorspace (not CMYK, that's for print, or LAB, that's for color theorists or special landscapes.) In PS5, look up at your top menus, find Image, and then Mode in the drop down menu, that list gives you the color space, and color depth. Adding a new layer (adjustment or otherwise), what we have done is adjust the curve of each color individually. Why? Because that's HOW THE HUMAN EYE WORKS, it increases its perception of contrast for each distinct visible light way. So with increase the contrast of Red, ONLY in the area that we're interest in, not across the full range. For this particular subject, and most any photograph involving people, it is the face. We find the lightest value of red in the photograph (probably the forehead) and then lightened it even more, and found the darkest value of red (probably the left cheekbone), and darkened it even more. We did the same for the Greens and finally the Blues. In this fashion we can also color correct similar to the way our eyes color correct. Notice that when you look at a room with a flourescent light you continue to think the page of paper in a book is still white, (despite the fact that each type of light has a different color cast)? That's your eye helping you out. No matter how good the sensor in the camera you own (yes, that includes the $40k Hassalblads), it simply cannot change its white balance and ISO (light sensitivity) on the fly for VARIOUS AREAS of the frame. We just can't do that yet.

And that's all that we have done. No Exposure adjustment in Camera Raw, no Vibrancy adjustment, no Saturation adjustment, no crop tool, no Brush tool, no Heal tool, no Rotation of the frame, no Levels, NOTHING!

So maybe you consider yourself a 'purist,' whatever that means, and you don't want to learn Photoshop. Well, then so be it. I agree on many purist ideas, all good photographers do. Here are some:

Get the exposure right the first time.
Get the best contrast through the lens (use a hood, stop the light down, meter off a constant source, etc.)
Get the composition right in the frame.
Get the best shot out of the camera you can get.

Then you'll have a great STARTING point, and make as little adjustment in Photoshop as necessary.

For those who want to try this at home, no parental supervision is required:

Mode: Manual:
Camera: Canon 5D Mark II
Lens: 70-200mm f2.8L @ 100mm
Shutter Speed: 1/200 sec.
Aperture: f5.6
ISO: 800

Lighting:
Key Light
580EX II, shoot through white satin 43" umbrella, about 35° camera left, above ~2.5 ft, pointing just right of subject (for feathering the key light).
Mode: Manual
Setting: 1/8 power at 105mm

Fill Light (If you don't have a second flash, you can use a reflector)
580EX II, shoot through a reverse white satin umbrella (approx 1 stop diffuser), at subject base (for fill light).
Mode: Manual
Setting: 1/32 power -2/3 stop down at 105mm

Further Reading:
- Hit the link HERE.
- Get Dan Margulis's book: Professional Photoshop: The Classical Guide to Color Correction, the latest edition is the 5th. And read it at least TWICE.